Heirloom & Open Pollinated

| September 8, 2012
Photo Credit: Keith Knoxsville
A Hen and a Drake Green Teal on the truck bed. Not a limit on anything, but a fun morning out.

An heirloom plant is a cultivar that existed before plant breeders introduced hybrid cultivars. However, authorities don’t agree on an exact cutoff date.

Although open-pollinated cultivars have been introduced after 1951, a widely accepted date, others believe the cultivar needs to have a documented history of 50 or even 100 years. Some believe the date to be 1945.

Regardless of which camp you are in, the basic principals generally apply. The plant must be open pollinated, and cannot be a hybrid produced by a breeder through controlled pollination or genetic modification.

There are some caveats and exceptions. A good example is Bloody Butcher Corn, which has a rich documented history dating back to about 1845, but originated in the 1800′s by mixing Native American corn with settlers’ corn. Which makes it a hybrid, but it predates most authorities’ standards.

Other cultivars, like Oaxacan Green Corn or Hopi Blue corn more closely adhere to the rules, and are ancient varieties that have existed for centuries.

So what is the open pollinated component to the heirloom rules? Open pollination is pollination through natural mechanisms. Those mechanisms include, insects such as bees, birds, wind, or self pollinating(cleistogamy) plants.
There are also exceptions and caveats to open pollination. Many heirloom cultivars have been propagated and maintained through cuttings and transplants, which requires no pollination. With the exception of self pollinating plants, open pollination does not regulate the parent source of pollination.

Open pollination results in plants with a wider variation in genetic traits, and increases biodiversity. In that way, the principles of open pollination clash with the definitions and principles of heirloom cultivars. A 1st generation of an open pollinated cultivar can produce undesirable ‘rogue’ plants, that exhibit genetic traits that are significantly different from their parent plant.

Tags: , , , , | Comments

LED Grow Lights

| September 6, 2012
Photo Credit: Keith Knoxsville
A Hen and a Drake Green Teal on the truck bed. Not a limit on anything, but a fun morning out.

DIY LED Lightitng

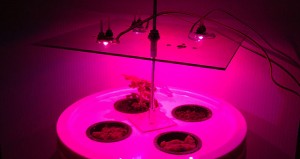
Build your own hydroponic LED growlight/system for germinating indoors. The system powers 1-4 3watt RGB LEDs on the Red and Blue channels.

The system easily fits on a bookshelf or desktop, and provides enough light for small sprouting plants to grow both thick foliage, and healthy stalks. Adjustable lighting height, prevents leggy growth.

Gardenisto takes no responsibility for the accuracy of the information posted, any injuries, death, or damages resultant from incorrectly attaching electrical devices.

Components
3x 1 watt RGB LEDS
3x Constant Current LED drivers
1x Sheet .125 Lexan
Nylon 4-40 Screw
4-40 washers and nuts
Large Project Enclosure or Conduit Box
AC Power cable (scrapped from old electronics)
12g 600v UL Cable (we actually used 18g)
24g UL Cable for dc wiring
¼” threaded rod and nuts
Mix pack of rubber grommets
Terminal Strip with a minimum 6 attachment strips
Terminal Jumper Strip
8 solderless terminal connectors

Drill w/Various Drill Bits
Skill Saw (or other saw for cutting plexi or lexan)

Basic Principles
LED Driver provides ample power for RGB LEDS
Red and Blue LEDs of the R-G-B LED will be powered, providing only usable light for germinating and growing young seedlings.

Pros
Compact Perfect for small desktop sized hydroponic germination units
Optionally Arduino controlled lighting
Low Power Consumption

Cons
Cost prohibitive versus off the shelf LED Grow lights with a standardized wall outlet
Power Consumption

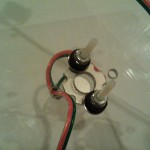
Backside flush mount LED with nylon 4-40 screw, grommet, washer, and nuts
Flush mouonted rgb led with nylon 4-40 screwLED growlight DIYTrim Lexan to size of hydroponic bucket
Drill Center mounting post hole
Mark 4-40 size LED mounting holes
Mark center on lexan where LED will mount, this is where a cooling hole for the led will go
Drill mounting holes
Drill LED cooling holes
Mark and drill one additional hole, near each LED (this is where wires will pass to backside of lexan mounting plate)
Mark mounting holes for constant current LED drivers
Tap if enclosure is metal to prevent drill bit travel, then drill LED driver mounting holes
Mount LED drivers with 4-40 mounting screws and nuts

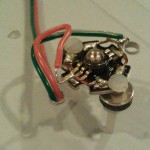
Solder the Red and Blue positive terminals to a red 24g wire approximately 3 feet in length
Solder the Red and Blue negative terminals to a black or green 24g wire approximately 3 feet in length
Repeat soldering for each LED on the system
Mount the LEDs to the Lexan mounting plate with Nylon 4-40 screws.
For a secure fit, place a rubber grommet on the backside of the mounting plate, sandwich the grommet with a washer and secure with a nut. Compression of the grommet will ensure a tight fit.
Run wires out of the way of the LEDs through the cable hole

Crimp terminal connectors to the Live and Neutral of the AC power cord
Cut and strip the ends off of 3 6 inch lengths of (Live Color) 12g wire
Cut and strip the ends off of 3 6 inch lengths of (Neutral Color) 12g wire
Crimp terminal connectors to a single end of each 6 inch length of wire

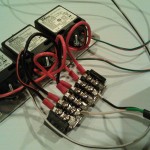
Cut the terminal jumper into two, three row lengths of the terminal strip.
Attach the LIVE end of the AC power cord to one set of the three terminals
Attach the NEUTRAL end of the AC power cord to the other set of three terminals
Attach the bare end of each 6 inch LIVE wire length to the constant currant LED driver in the appropriate screw terminal (Labelled “L”)
Attach the bare end of each 6 inch NEUTRAL wire length to the constant currant LED driver in the appropriate screw terminal (Labelled “N”)

Attach the terminal connector at the end of each 6 inch LIVE wire length to the LIVE terminal slots of the terminal strip.
Attach the terminal connector at the end of each 6 inch NEUTRAL wire length to the NEUTRAL terminal slots of the terminal strip.

Attach the LED wire leads to their respective LED driver screw terminals.
– Red wire to the screw terminals labeled “+”
– Black or Green wire to the screw terminals labeled “-”

Tags: , , , | Comments

Mycorrhizae

| September 1, 2012
Photo Credit: Keith Knoxsville
A Hen and a Drake Green Teal on the truck bed. Not a limit on anything, but a fun morning out.

The science of plant health has moved well beyond basic plant nutrition. Research has shown the importance of proper nutrition, vitamins, plant hormones, light wavelengths, and even beneficial fungi.

Beneficial fungi that live in the rhizosphere(root system) of your plants, create a symbiotic relationship that can really help your plants thrive!

There are two primary ways these relationships work, and they involve two types of mycorrhiza. Endomycorrhiza(Endo – inside) and Ectomycorrhiza(Ecto – outside).

Endomycorrhizae penetrate the root walls, and feed on the host plants steady supply of carbohydrates in the form of sucrose and glucose. In return they create mycelia, thread like structures that extend outwards from the root walls. The mycorrhizae’s mycelia make both water and nutrients more available to the host plant through an increased surface area.

Ectomycorrhizae live outside the root walls of the host plant, and play host themselves to nitrogen fixing bacteria. These bacteria convert nitrogen into nitrate, which becomes usable to the host plant. The relationship increases the nitrogen available to a host plant, and allows a host plant to grow in nutrient poor locations.

Mycorrhizae effectively harden the host plant to drought, nutrient deficiency, and disease. Geek speak put aside for a minute, this is really good stuff. Fortunately, you don’t have to know someone on the inside of an agriculture research lab to get some either. Many products on the shelves at local nurseries, home improvement stores, and hydroponic shops, will carry products containing various mycorrhizae. If all else fails, buy it online.

Tags: , , , | Comments