DIY Organic Liquid Fertilizer

| May 22, 2012
DIY Hydroponic Fertilizer
Photo Credit: Keith Knoxsville
A Hen and a Drake Green Teal on the truck bed. Not a limit on anything, but a fun morning out.

Given the prices of already diluted or inorganic fertilizers, we thought it would be of value to our readership to get a quick guide on how to make your own organic liquid fertilizer. This is not a simple how to on the traditional ‘tea’, like compost, manure, earthworm casting, cinnamon, or chamomile tea, but an actual liquid kelp based fertilizer for use in the garden or in hydroponic system.

In addition to kelp that was freshly collected on the beach, other organic ingredients are added to the brew. They include calcium, magnesium, zinc, iron, molasses, sugar, and yucca extract.

  • Wash fresh kelp to remove excess salt and non plant material.
  • Blend on a high liquefy setting with equal parts dechlorinated or spring water, until contents are a liquified.
  • Strain emulsion over a small bucket.
  • Dissolve a couple table spoons of cane sugar, into one half cup of dechlorinated water
  • Add sugar water to bucket.
  • Add molasses and any other extracts, vitamins or minerals to the liquid.
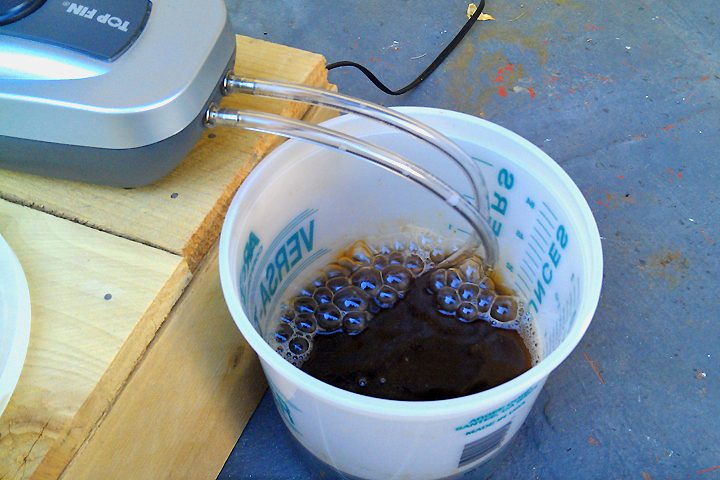
  • Agitate the brew with an air pump, just like you’d aerate water in a fish tank. Do this in warm conditions, and agitate for a few hours at a minimum. Warmer liquid temperatures will help increase good bacteria growth, but too hot a temperature will kill them.
  • When the brew looks good and dark, pour the concentrate through a fine screen or or mesh to remove solids.
  • If you seal the cap on your storage container, you may need to ‘burp’ your container regularly to release gases created by the beneficial bacteria in your living fertilizer/brew.

Usage
Usage depends on concentration and plant feeding requirements. Concentrations can range from a ½ ounce per gallon to 1 part fertilizer per 3 parts water.

The frequency of use depends on system and fertilization needs. Use weekly in deep water culture systems and in out door gardens that require fertilization. The dilutions will depend greatly on how concentrated the original concentration is and the sensitivity of the target plant. Like most garden experiments either start small, and increase your usage, or use liberally on a donor plant you are willing to lose to observe a ‘lethal’ limit.

To create a more complete nutrient solution, mix with soluble urea, and humic acid at the time of use. As always, dilute before use.

Observations
Plants treated with the kelp based liquid fertilizer are exposed to the natural hormones and over 50 trace elements. Treated plants seem to maintain a healthier rhizosphere, and an improved tolerance to environmental stress, as is expected of good mycorrhizal activity.

Of course the observations are just that, observations. We have not cultured bacteria from a treated and non-treated plant, and measured the difference in beneficial bacteria. Nor have we intentionally stressed plants that were treated and measured survivability against any controls.

Tags: , , , , | Comments

Deep Water Culture Transplant

| May 8, 2012
Photo Credit: Keith Knoxsville
A Hen and a Drake Green Teal on the truck bed. Not a limit on anything, but a fun morning out.
While it is best to start a hydroponic garden from seed, it is also possible to transplant sprouts from containers and peat pots.

Transplanting sprouts from soil to a hydroponic system can introduce a lot of organic material. Organic materials can introduce destructive microbes, mold spores, and disease that can ultimately destroy your plant, or even your entire hydroponic crop. This type of plant destruction can be prevented, by taking a few precautions.

Materials
Hydrogen Peroxide, Spray bottle, net pots, container plant, razor blade, rockwool, small bucket or large Tupperware container.

Prior To Transplanting
Prepare your hydroponic system to receive a new plant. In our case, this is a 5 gallon DWC (deep water culture) bucket that has been ph balanced between 5.5 and 6.5, de-chlorinated, and heavily aerated.

Some planting mediums need to be prepared ahead of time. So if your planting medium requires a presoak in PH balanced water or a sterile rinse, prepare this prior to proceeding with transplanting.

Transplanting

Step 1
Gather and sterilize materials.

Step 2
Fill a small open top container with clean water. While others might disagree, tap water is actually good in this case because it is chlorinated. The chlorination will help to destroy microbes, and other unwanted organic material on the plants root mass.

Step 3
Extract the plant and root ball from container. If you are starting with a peat pot, it’s easiest to soak the peat pot before crumbling it away.

Step 4
Very gently remove as much soil as possible with your fingers. Be careful not to damage any of the roots, or small hairs on the roots. At this point, your plant will still have organic debris, vermiculite, bark, perlite, or even chunks of peat pot attached to the roots.

Step 5
Holding the green portions of your sprout out of the water container, place the root mass in the water container. Agitate the water over the root ball until all the dirt and organic material is removed.

Step 6
You will likely have to stop, replace the water from your washing container, and repeat the previous step a couple times, to completely remove all organic matter attached to the root mass of your plant.

Step 7
Rinse the root mass, by spraying it with a diluted H202 Hydrogen Peroxide solution. We made our rinsing solution with 3% Hydrogen Peroxide, and diluted it to 3ml for every liter of water. H202 can be dangerous, treat it as you would any other hazardous material. Especially if starting with a higher concentration of H202.

Step 8
Since we are using rockwool for our transplanting example, with a razor blade we slice into the rockwool from the side, all the way to the center where you would typically sow a seed.

Step 9
Gently stretch the rockwool open, and insert the sprout. If the root mass does not fit, or fits too tightly, either stretch the rockwool or slice away some rockwool to accommodate for the sprout.

Step 10
Insert the freshly prepared sprout into our net pot. Depending on plant size, you may need to add other growing mediums around the rockwool, such as red clay, or perlite..

Tags: ,